A complex web of conflicting standards must be followed when setting up a smart home, and hubs, dongles, and numerous apps are required to control everything. There is a better way, but it is really exhausting. No, it is not installing smart speakers throughout your house to connect to the applications on your behalf, though it is one possibility.
Home Assistant is the one system that controls them all. This amazing smart home management solution may be used as a Docker container or as a full-fledged operating system. It connects to thousands of other companies’ APIs, allowing you to automate your smart home in a system that you control.
What you will require
You will need a few items before you begin your simple smart home journey.
- A device to run Home Assistant on: You can get a ready-made hardware system from HA, use a SBC, a NAS, or any x86-64 computer hardware
- A formatted flash drive with at least 8GB of capacity: This is only needed if you’re installing Home Assistant as the OS on your computer
- Virtualization software: If you prefer to use a virtual machine for Home Assistant, you will need to install software like VirtualBox or VMware Workstation Player
- A second computer or phone: To access the Home Assistant server once installed to set up configurations
Home Assistant OS install
The ideal approach to use Home Assistant OS (HAOS) is to run it, which gives you access to all of its features, including one-click updates and add-ons. With one exception—which we will discuss in a moment—installing HAOS on a laptop is essentially the same as installing any other operating system.
Using a live Ubuntu USB, downloading a HAOS disk image, then using the live environment to restore the disk image to the drive of the computer we will be using with HAOS is the officially approved method of installing HAOS. Although it sounds complicated, it is actually very simple.
Create an Ubuntu flash drive
- Download the latest version of Ubuntu from the official website.
- Download the latest version of Ubuntu from the official website.
- Insert the flash drive into your PC.
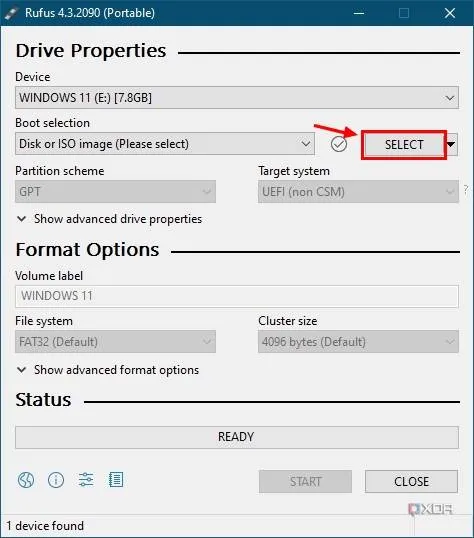
- Open Rufus, and under Boot selection, make sure it reads Disk or ISO image, then click SELECT.
- Browse to the Ubuntu image you downloaded in step 2 and select it.
- Select START and wait for Rufus to create the bootable USB.
Now it’s time to boot into that live USB and get HAOS installed.
Boot into live Ubuntu
Now it’s time to get HAOS ready to roll.
- Put the USB drive into the computer we’re going to use for HAOS and reboot it.
- Press the keyboard key to access your computer’s boot options. Depending on your machine, this could be F12, F11, F10, Esc, or Del.
- Select the USB drive you plugged in from the list that appears.
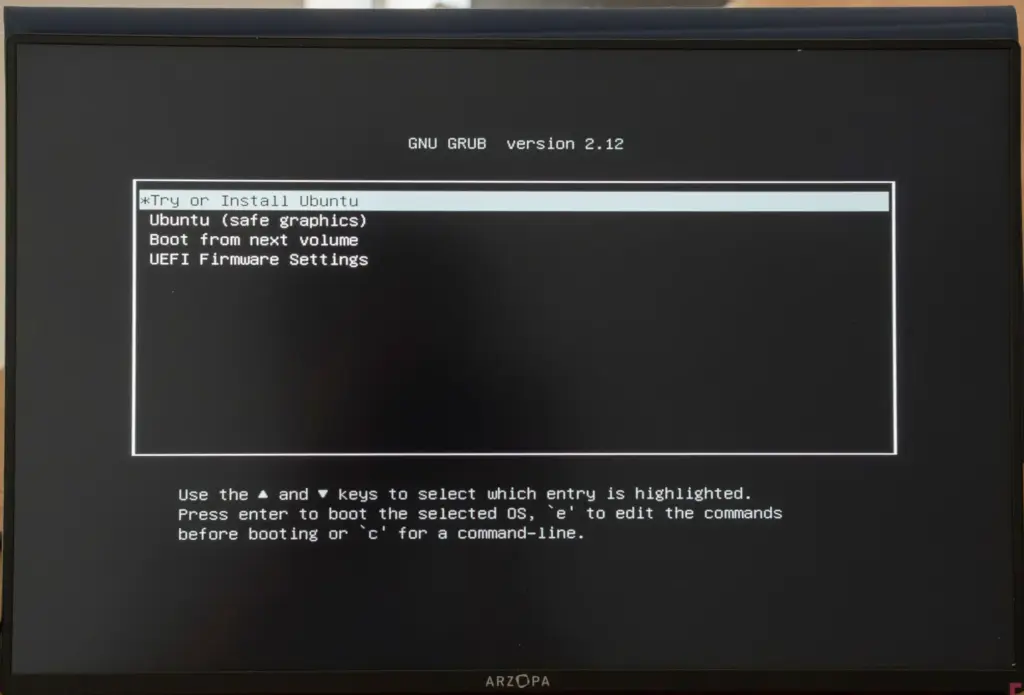
- Once booted, you’ll see a menu for installing Ubuntu. Select Try or install Ubuntu, and press Enter.
- Follow the setup process until you get to the desktop, including connecting to the internet.
- Launch Firefox, navigate to this article, and download the HAOS image from the GitHub page.
- Open the Applications menu in the bottom left corner, search for Disks, and open the tool.
- Once the Disks tool opens, select the main drive on your PC.
- Select the three-dot button, and select Restore Disk Image.
- Select the image you downloaded from GitHub and select Start restoring.
- Select Restore one more time to confirm.
After the restoration process is finished, turn off the computer using the power menu located in the upper-right corner. After removing the USB drive, restart the computer. After starting up, the Home Assistant OS will begin downloading the necessary software from the internet. It will eventually be finished and loaded into the dashboard.
Installation in a virtual machine
Nobody stated that Home Assistant OS must run on a separate device, even if it is the most functional alternative and the best method to run things. Alternatively, Home Assistant can be installed on NAS gear, an outdated PC, or the computer you use every day and run in a virtual machine will still be able to handle your smart home.
A virtual machine for a Linux-based computer with an internet connection, at least two virtual CPUs, 2GB of RAM, and 32GB of storage is required, depending on the virtual machine software you choose.
Additionally, Home Assistant contains complete system disk images for the most widely used virtualization software, so you will not need to go through the ISO installation process:
- Home Assistant image for VirtualBox (VDI)
- Home Assistant image for VMWare Workstation Player (VMDK)
- Home Assistant image for Hyper-V (VHDX)
Setting up Home Assistant
Finding and connecting your gadgets is comparatively simple once Home Assistant is installed and operational. Many of the more well-known gadgets are immediately detected and integrated, but it does depend on the smart home systems you are using. Some require more work to connect to Home Assistant. For those that are automated, the overall setup procedure looks like this:
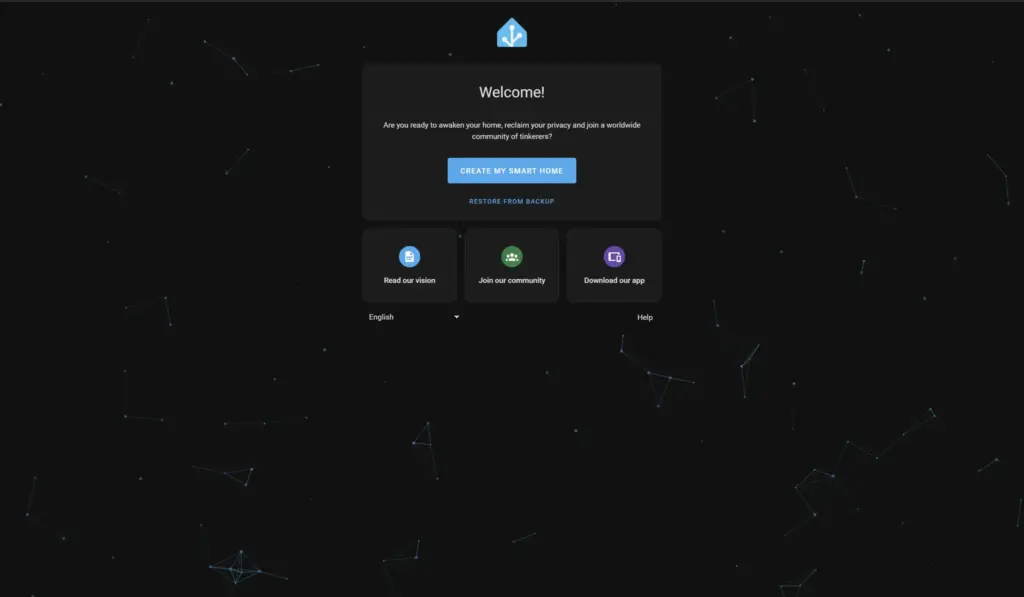
- Open a web browser and go to homeassistant.local:8123. Sometimes this doesn’t work, and you have to put in the URL of the device running your Home Assistant instance.
- Select Create my smart home to get started.
- Enter your desired account name and choose a password.
- Select a location for your home, so that Home Assistant can give you weather information.
- It will ask you if you want to share data with the Home Assistant developers. It’s your choice, and the default is not to share.
- Home Assistant will now detect any devices in your home. Select Finish, and every device found will be added to your dashboard.
- The Settings tab is where you can manually add more integrations or automation, configure existing integrations, and more.
You have probably connected the majority of your smart home devices, and your Home Assistant is now operational. You may now use it for a variety of purposes, including as connecting systems and services that do not have native connectivity or adding features like presence sensors to control music, lighting, and other things.
One of the greatest tools for controlling the several smart home ecosystems that are installed in many homes is Home Assistant. You can be certain that it will function similarly to the official applications and that you can control them all from a single dashboard because it makes use of the official APIs of those smart device manufacturers.
Additionally, you may access Home Assistant from any location by setting up a Tailscale instance or VPN. If you want to link things like presence sensors to control chains of smart home operations, you can even design your own integration or automation. There are a ton of options accessible.


